
I’m a big AWS fanboy, and although I absolutely love Octopus Deploy and advocate for it wherever I go, CodeDeploy is my preferred method of deploying in AWS. That said, when working with Linux and .NET core it’s not a simple process to get things deployed seamlessly (at least as a Windows dev).
In this post, I’ll cover the steps to get a .NET Core web application running inside an Amazon EC2 instance using CodeDeploy. The aim being to demystify would appears to be black magic. You’ll finish with a CodeDeploy setup that will deploy your .NET Core application to an individual EC2 instance. We won’t cover load balancing, and the advanced deployment types you can use in CodeDeploy (phased rollout, Blue/Green, Canary, etc.). There are tons of advanced features, and those are the same no matter what code you deploy.
There’s also a fair amount of pre-requistes you’ll need to do if you’re doing this from scratch. In isolation this post may not be massively useful as you’ll need to couple a few other services to get something production ready (CodePipeline, CodeBuild, Monitoring etc.).
Note: The code for this is freely available on my github account https://github.com/martinjt/codedeploy-dotnet
Pre-Requisites:
- AWS Account
- S3 Bucket for your deployment package
- CodeDeploy general setup steps (https://docs.aws.amazon.com/codedeploy/latest/userguide/getting-started-codedeploy.html)
- The important part is making sure the “Service Role” for the instances has access to the S3 bucket you created.
- An EC2 Instance to deploy to
- You’ll need to tag it with at least 1 thing so that CodeDeploy can find it.
- You’ll need to install the CodeDeploy Agent as part of UserData (https://github.com/martinjt/codedeploy-dotnet/blob/master/scripts/user_data.sh)
- The image will need dotnet core 3.1 installed, there is a standard AMI produced by AWS.
- Add TCP Port 80 to the Security Group and allow your current IP access to it.
Linux Hosting Dotnet Core
In this example, we’ll be running kestrel directly. The Microsoft guidance is to use a reverse proxy in front of kestrel. I’m not going to advocate away from this, but this tutorial will NOT do that.
I believe that the guidance is based around directly allowing Kestrel access from the internet, and that isn’t the way I’d advocate for within AWS. In most scenarios, you would put the instances behind an Application Load Balancer which is a reverse proxy and this will do SSL Termination, routing, and handling client connections, so the instances can be simple and just expose Kestrel to the Load Balancer.
The CodeDeploy Package
A CodeDeploy package is the way we tell CodeDeploy WHAT to deploy, but also “HOW”. Unlike tools like Octopus Deploy, the CodeDeploy application has no knowledge of how your application will be deployed to its’ targets. This is all stored inside your CodeDeploy package in an appspec.yml file.
In additional to the “HOW”, your package can contain all the supporting scripts you’ll need to deploy the application. Obviously you could pre-bake these scripts into an AMI, but, where’s the fun in that? On a serious note, packaging your scripts inside your deployment package can provide a lot of advantages around versioning your deployment process.
The structure of our repo will be done in such a way that will allow easy creation of the package in the right structure.
root
 - src
   - dotnet-codedeploy
     - ...
     - dotnet-codedeploy.csproj
 - codedeploy
   - deploy-scripts
     - ...
     - application_start.sh
   - app
     - {Empty until we've published the application}
   appspec.yml
The codedeploy directory will be our layout inside the package. For now, the app directory will be empty as we’ll be publishing our application to here.
QUICK NOTE ON LINE ENDINGS: You’re in linux world now, and line endings are important. The scripts and file we’re going to create here will be interepted on a linux system, therefore need to be using LF, not CRLF which is the default on windows. This WILL catch you out, so make sure you check it if anything goes wrong.
AppSpec.yml
The appspec.yml is the entrypoint that CodeDeploy will use to setup and install your application on each instance.
Here is the one we’ll use:
version: 0.0
os: linux
files:
  - source: app
    destination: /var/www
  - source: deploy-scripts/website.service
    destination: /etc/systemd/system
hooks:
    ApplicationStop:
      - location: deploy-scripts/application_stop.sh
        timeout: 10
    BeforeInstall:
      - location: deploy-scripts/before-install.sh
        timeout: 10
    ApplicationStart:
      - location: deploy-scripts/application_start.sh
        timeout: 10
There 2 main sections you need to care about here.
files – this covers anything that needs to be copied from the package to the filesystem of the target machine. Here we’ll copy our application code /var/www and put our systemd service file in the right place (we’ll cover what this does later in the post). This all happens during the “install” part of the CodeDeploy
hooks – this is where we point to the bash files that we want to run during our application lifecycle. We won’t be using all the points of the lifecycle here, but there quite a few points you can inject scripts into.
systemd Service
systemd is analogous to the system behind Windows Services. This is what will ensure that Kestrel is running our application, and pass all the relevant variables.
Services are defined by adding a file with configuration to a specific directory, then running a command to enable the service which will register it with systemd.
Note: this isn’t the most accurate description of systemd. I’m not an expert on it, what I’m trying to do here is relate the concepts to what people may be familiar with from a Windows hosting context. If you would like to know more about systemd I’d advise using some other source than me.
This is the service file for our Kestrel powered .NET Core site.
[Unit]
Description=Start the Website

[Service]
WorkingDirectory=/var/www/
ExecStart=/usr/bin/dotnet /var/www/dotnet-codedeploy.dll
Restart=always
RestartSec=10
KillSignal=SIGINT
SyslogIdentifier=website
Environment=ASPNETCORE_ENVIRONMENT=Production
Environment=DOTNET_PRINT_TELEMETRY_MESSAGE=false
Environment=ASPNETCORE_URLS=http://*:80

[Install]
WantedBy=multi-user.target
The most important part here is the ExecStart line which is what will start our application. The next most interesting part is the Environment lines, these allow us to set particular Environment variables for our service.
I’m sure at this point, you’re thinking about lots of possibilities around how this file could be used for configuration management. It’s important to note however, that this file will be the same in all your environments.
Lifecycle hooks
You’ll notice that we’re using 3 of the deployment lifecycle hooks in our code. There are a lot more than can be used, one interesting one is “Validate Service”, but there are others you can use to do more interesting things. Here’s what ours are going to do.
application_stop.sh – this will stop our systemd service, and disable it.
systemctl stop website.service
systemctl disable website.service
before_install.sh – This will remove our currently deployed code, and remove the service file.
rm -r -f /var/www/*
rm -r -f /etc/systemd/system/website.service
application_start.sh – this will enable to the systemd service, then start it
systemctl enable website.service
systemctl start website.service
.NET Website
There is seriously nothing special about what I’m building here. Literally:
dotnet new mvc --name dotnet-codedeploy
Do that from within your src folder and you’re good to go.
To compile and publish the application we’ll use this command to output it into the right directory:
dotnet publish -o ../../codedeploy/app
Building the CodeDeploy package
This is the simple, yet specific, part of the process. We’ve already created the structure of this package as our codedeploy directory, so all that remains is to zip that up.
Compress-Archive ./codedeploy/* artifacts\codedeploy.zip
Note: The * in that commandline is vitally important. The root of the package needs to have our appspec.yml, without the * you will have a subdirectory in your zip.
CodeDeploy Setup
I’m expecting that you’ve followed the setup guide for CodeDeploy (https://docs.aws.amazon.com/codedeploy/latest/userguide/getting-started-codedeploy.html), and you’ve also got an Instance with dotnet installed, the CodeDeploy Instance profile attached and at least 1 uniquely identifying tag we can use.
Creating the CodeDeploy Application
The first step to setuping CodeDeploy is creating the application… this is obviously incredibly complicated… it’s 2 boxes, on is freetext, the other you need to select EC2.
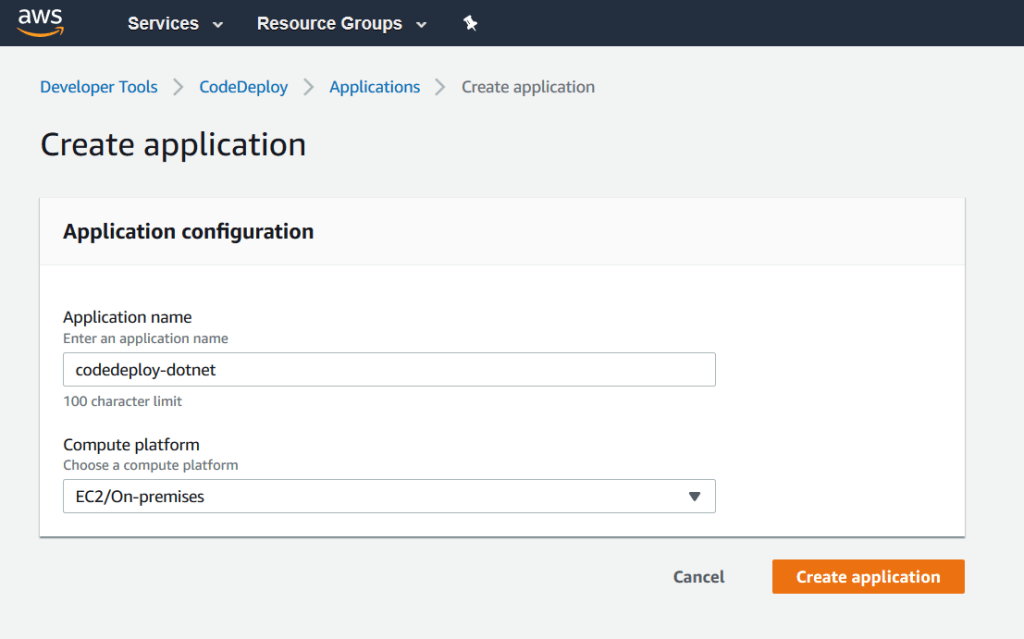
Oh, wait, that’s it… maybe that’s not complicated 🙂
Yes, the application doesn’t really do that much. It’s a container for the Deployment Groups which are what do the real work.
Create The Deployment Group
Inside the CodeDeploy application, you create “Groups” which is where we will deploy our package to.
These groups allow us to configure the “Where” and “How” of the deployment. In 99% of cases, I envisage these being the Environments you’ll deploy to (Test, Stage, Production, DR, etc.). It’s important to understand here that the settings here are “Per Environment”. You can chose to deploy to test “All at once” as you don’t care about downtime, and then Production is Blue/Green with Rollbacks.

The first things to setup are a description name, then apply the role you created as part of the AWS CodeDeploy tutorial. Then the Deployment Type, which for this tutorial will be “In-Place” as we’re just going to replace the code on the server each time.
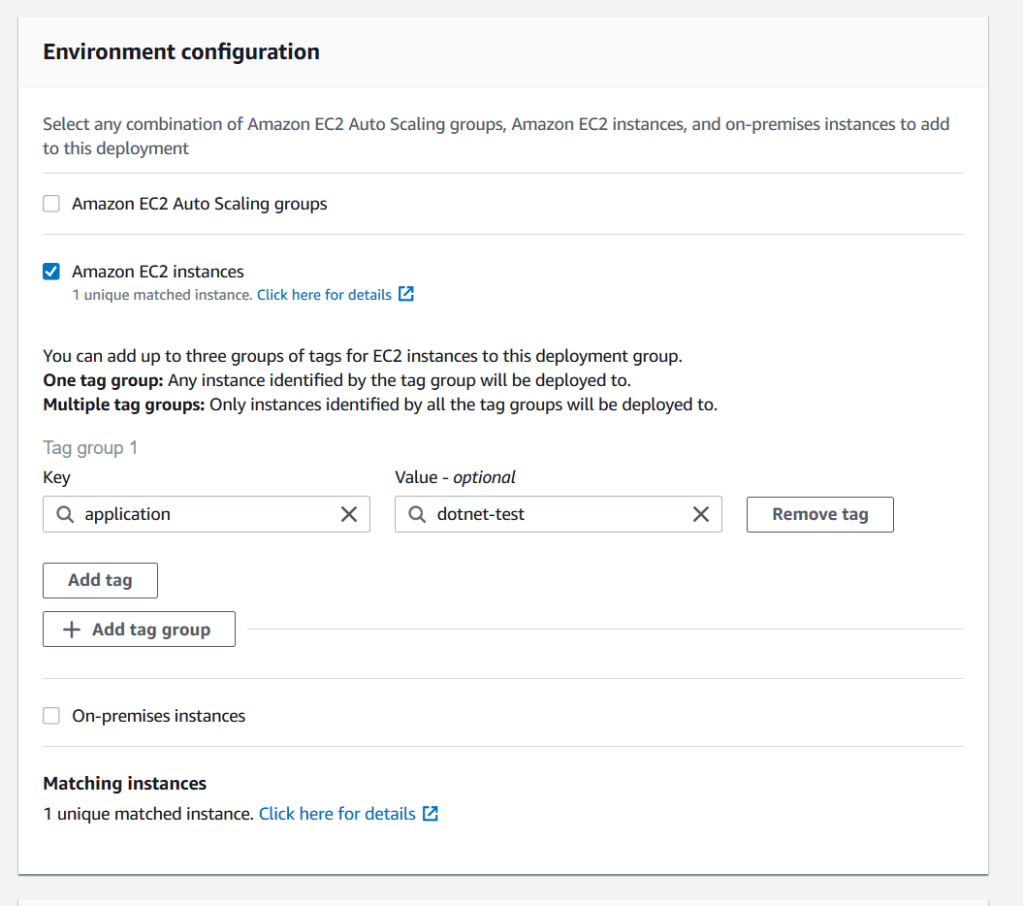
The next part is to select how to find our instance. Most of the time, I’d recommend targetting an Auto-Scaling group rather than an Instance, but this tutorial is about dotnet core, and not about CodeDeploy. Addin your Tag that will uniquely identify the instance to deploy to. You should see “1 unique matched instance” in the bottom of the panel.
That’s it for setup. There are loads of advanced things you can do with CodeDeploy and you should look into them.
Deploying the Application
For this you’ll need your S3 bucket. CodeDeploy requires the package to be in S3, normally, your automated build process would push the package to there, but we’ll do it manually for this post.
Note: the bucket does NOT need to be public, nor does the package. The role you applied to your instance should have access to that bucket to list the contents, and download the items.
Upload your package to the bucket in your preferred way. Personally, I just drag and drop in the UI, but using the CLI would work just as well.
Now we have our package in S3, with the right format, and we have a CodeDeploy Deployment Group, we can create a Deployment.
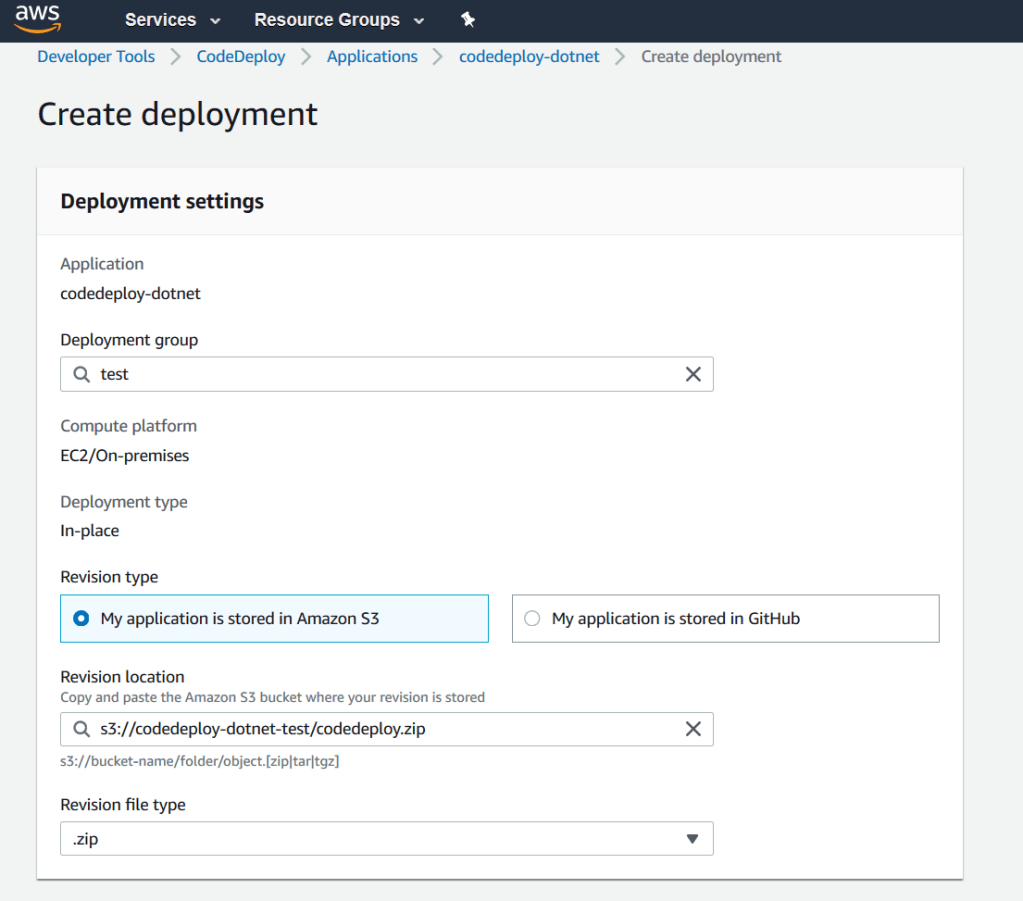
Choose your Deployment Group, then point to your uploaded package in the Revision (There is no auto-complete which is understandable, but disappointing).
As soon as you click Create, you should be taken to the deployment page which will eventually look like this:
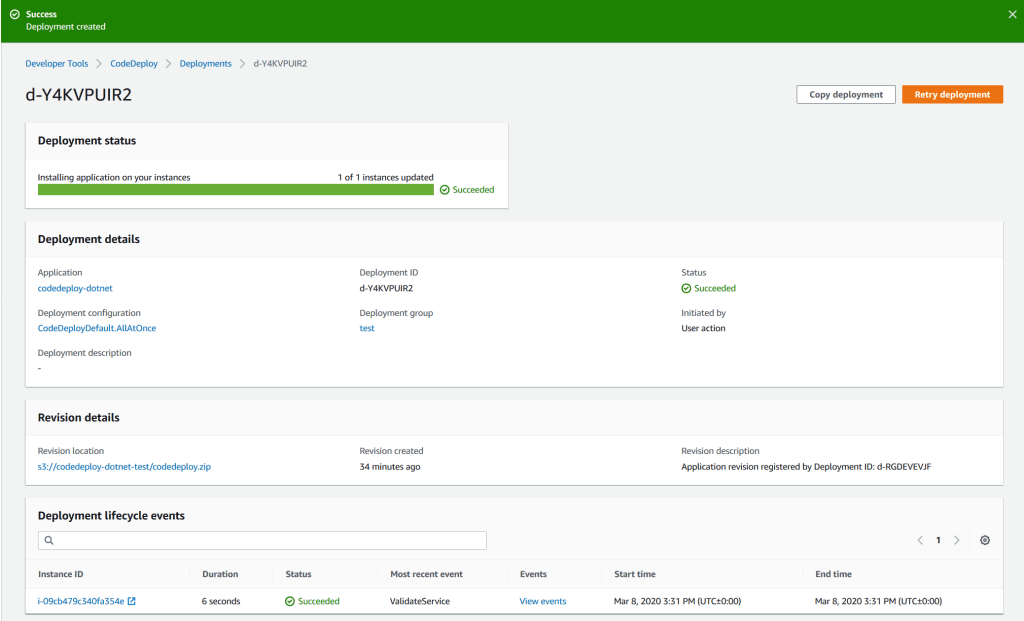
There you go, access the instance’s IP in a browser, and you should see your site.
Conclusion
I love CodeDeploy. The fact that it’s basically built into AWS, and free makes it a natural choice. There are tons of inbuilt functionality that make production deployments safe and easy. I particularly like Blue/Green deployments and Rolling Deployments using Load Balancers, the fact that it manages bringing instances online, taking them out of the load balancers etc. is just amazingly simple.
The speed of deploying, and the latency from creating a revision to it being online is amazing, to the point where you won’t actually believe it.
The Bad…
Unfortunately, you do lose some things in this approach. At least compared to Octopus Deploy.
Parameters – You can’t define a parameterisation for each deployment. They’re all the same. So you need a separate mechanism to do the Parameters.
Dashboard – This leaves a lot to be desired. Finding the revision currently deployed etc. is REALLY hard. I want to have this on a Wallboard somewhere, easily viewable, but it’s just not available.
Cross-Account – You can’t have a Deployment Group in another account. I’m a massive fan of Multi-Account setups in AWS, specifically separating Test/Dev from Production. It would be amazing to have single application that could deploy across accounts… unfortunately that doesn’t work and we need to do lots of work to make that work.
Initial Setup – This could be ALOT smoother. There needs to be more “wizards” and auto-created roles like a lot of the other AWS Application. Specifically, getting roles and managed policies created should be automated as it trips up a lot of people.
Troubleshooting – You can feel a lot in the dark with this. Logging onto instances, finding the wrong places to get logs etc. Once it’s setup, you don’t need all this, so it’s mostlly when you’re just getting started.

awesome nice explanation,
but I wanted similar with Github, could you please give me direction how I can deploy code from GitHub with push command.
I just need to push code to Github and code deploy to AWS Linux server.
I am using Centos Linux server and .net core 3.1 API
LikeLike
That’s a more involved topic, you should be looking into Code Build to build the package, then using CodeBuild to trigger the CodeDeploy process as it exists in this article.
LikeLike